If you’re using netbook and want to install Windows 7 into it, you’ll most likely need to use a USB Installation Disk since Netbook doesn’t has a CD/DVD Drive (unless of course you have an external CD/DVD Drive). This guide will guide you on creating your own Windows 7 Installation USB.
 Note: If you’re too lazy to do it manually, you can use the tool that is provided by the Microsoft to get the job done . Grab it from here: http://emea.microsoftstore.com/UK/en-GB/Help/Windows-7-USB-DVD-Download-Tool
I won’t be explaining how to use that tool here, because the tool itself is pretty straightforward, just follow the instruction on the screen and hit the next button  .
.
So, here are a few things that you’re going to need to create a Windows 7 USB Installation Disk:
- A Computer running Windows 7 or Windows Vista, sorry no WinXP
 (you need to have a computer running Win7 / WinVista 64bit if you want to create a Win7 64bit USB Installation Disk, you can’t create a Win7 64bit USB Installation Disk using 32bit Win7 / WinVista)
 - Windows 7 Installation DVD
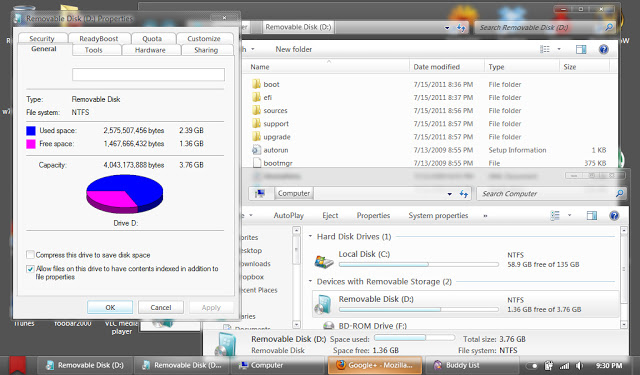
- A Minimal of 4GB Usb Flash Disk
That’s pretty much everything that you need, let’s get started shall we? 
Step 1: Preparing the USB Stick
First thing first, we gonna need to format the UFD (Usb Flash Disk), so boot up your Win7 or WinVista Computer, now the reason that we gonna use WinVista or Win7 is that because both OS has ‘diskpart’ utility which is need to create Win7 USB Installation Disk and since WinXP doesn’t have this utility, we can’t use WinXP (at least that’s what I know, correct me if I’m wrong @.@).
Open up the Command Prompt:
Start > All Programs > Accessories > Command Prompt

or

Just hit the Win+R key to upen up the Run Window, type in 'cmd' and hit enter.
Type in diskpart into the command prompt to open up the disk utility followed by ’list disk’ to list all the Storage attached to your computer (make sure you have plugged in your UFD).
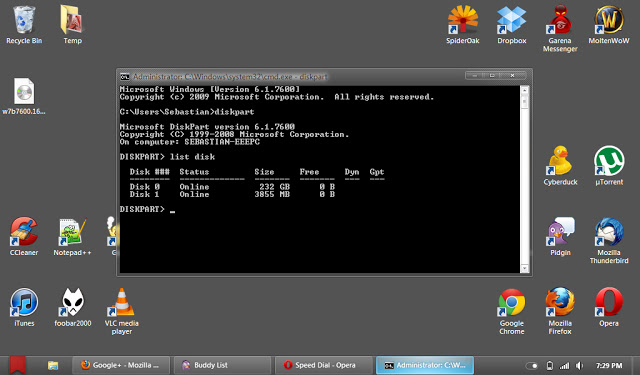
You should see a list of Storage/Disk currently attached to your computer with it’s information: Disk Number, Status, Size, Free, etc. Identify your UFD Disk Number, you can take a look at the Disk Size to easily identify which one is your UFD. In my Computer, my UFD Disk Number is # 1. After you’ve identified your UFD Number, type in the following command (one at a time) :
select disk 1
clean
create primary partition
select partition 1
active
format fs=NTFS
assign
exit
The formatting process will take some time, just wait for it to complete and you should’ve your UFD prepared, you should also noticed that after you type in the assign command, your UFD will be assigned a new drive letter or mount point, you may want to take note of the new UFD drive letter which will be needed in the next part.. Proceed to step 2.
Step 2: Making the UFD Bootable
Your UFD is ready, but it’s useless if you can’t boot from it  , so what we are going to do is that we’re going to make it bootable. We’ll be using the ‘bootsect’ utility to do this.
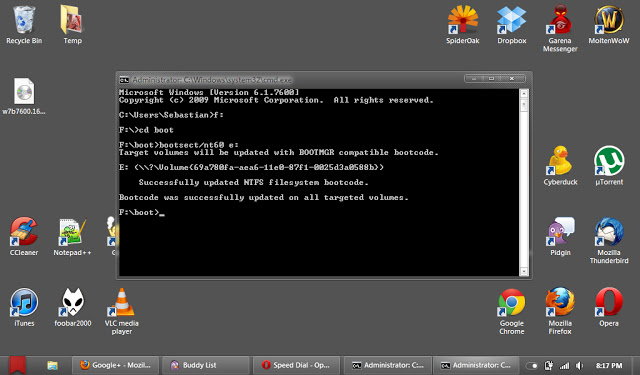
Insert your Windows 7 DVD, or if you’ve the .ISO file, just mount the .ISO file using Daemon-tools. Go back to the CMD or open a new one if you’ve closed it and change the current directory to the Windows 7 DVD’s boot directory.
My Windows 7 DVD is assigned as F: drive, so I’m going to type in the following into the CMD (change the drive letter according to your drive letter:
cd boot
Next we’re going to use the bootsect utility that is located in the directory to make the UFD Bootable, change e: according to your UFD Drive Letter.
bootsect/nt60 e:
Dang, your UFD is now bootable  ! Proceed to the last step
  .
.
Step 3: Copying the Windows 7 Installation file to the UFD

The title pretty much says what you need to do, open the Windows Explorer and simply copy all files from your Windows 7 DVD to your UFD Drive .
It’s done! Now you have your own Windows 7 USB Installation Disk .