AutoHotkey script to disable Windows key, Windows key + Tab and Alt + Tab key, useful to prevents accidentally pressing the keys when playing games, etc . . .
Disable Alt+Tab ;!Tab::Return LAlt & Tab::Return ; Disable Windows Key + Tab #Tab::Return ; Disable Left Windows Key LWin::Return ; Disable Right Windows Key ;RWin::Return The script above will disable Left Windows key and Left Alt + Tab key only, if you would like to disable both alt tab keys uncomment the following line:...
Reset jQuery UI Dialog Position on Open
If you have a jQuery UI dialog and wanted to reset its position every time the dialog is re-opened, you can add custom function to reset its position in the open event. This can be useful if you use the close method to close the dialog instance and intend to re-use the dialog box without re-initializing it again, i.e: myCustomDialog.dialog("open"), as the instance is not removed and the next time you re-opened the dialog its last position will be retained to the position before you close the dialog box....
Restart Copy and Paste (Clipboard) functionality in RDP
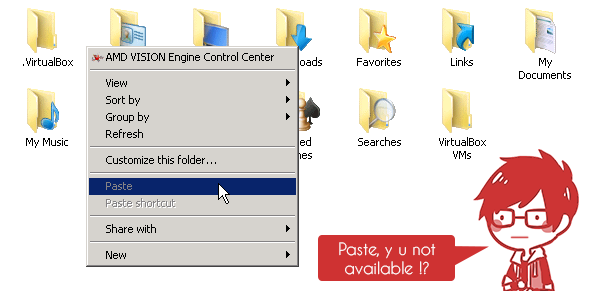
I was using remote desktop connection the other day to copy some files over to one of the server, however I noticed that the paste button is not available (it was greyed out) even after I have copied some files from my local computer, copying text does not work either.
I did a quick check on the remote desktop option to make sure that the clipboard option was enabled, and apparently it was enabled however the clipboard still does not work ....
Run Ngrok on Your Own Server Using Self-Signed SSL Certificate
Using ngrok is a great way to quickly demo/show your development to other people or for other purposes that you can think of by creating a tunnel from your local computer to the internet and the best part is it is free, you don’t even need to sign up to use its service although signing up will provide you with additional features and you can even pay for even more additional features available for paid user....
Disable OneDrive in Windows 8.1
By default Microsoft’s OneDrive (Formerly SkyDrive) is now built into Windows 8.1 and Windows 8.1 RT, hence whether you are using it or not it will automatically loaded during start up and the shortcut to your OneDrive folder will be displayed in the Explorer’s Navigation Pane. And since it is now integrated into Windows 8.1 there is no way to uninstall OneDrive, which is rather annoying as I’m not using OneDrive for my cloud storage....